Replacing door seal on Hoover WDM-130 Washing Machine
I recently replaced the rubber door gasket on a Hoover washer dryer. It’s the first time I’ve done any repairs on a washing machine and I didn’t find much information online. I haven’t read the Haynes Washing Machine Manual but it might have more information.
I worked on a Hoover WDM-130, but the procedure will likely be the same for other Hoover and Candy washing machines and possibly other makes.
Mouldy door seal and brown marks on clothes
The door seal, also know as door gasket, is the rubber that goes between the drum and the door and allows the drum to bounce around without any water escaping. It has lots of folds and these can get mouldy, start to smell and possibly leave stains on clothes.
There’s some good advice from UK Whitegoods on how to prevent it happening, such as leaving the door open to allow the seal to dry and doing a monthly “service wash” (run it through empty at a high temperature).
Once the door seal has mould, it’s difficult to get rid of. My washing machine was leaving brown marks on clothes after they had been through a wash, so I had to do something about it.
Replacing the door seal is not super difficult, but it’s quite awkward to get to. If you’re fairly handy and have suitable tools, you should be ok.
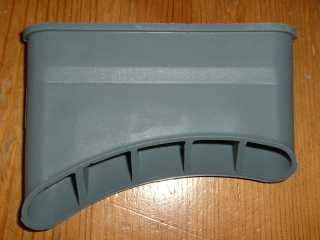
Replacement rubber gasket
I bought a replacement door seal from UK Whitegoods (part number 91620118 – Candy Hoover Door Seal). It was a good price and delivered quickly. The part looks green in their picture, but it is grey as you’d expect!
Tools you will need
- 7 mm socket
- 7 mm spanner
- 10 mm socket
- 13 mm socket (maybe)
- long T-bar handle for 7 mm socket (about 30 cm long) – or other way of turning it (I used a screwdriver)
If you don’t already have the tools, you might consider the Draper socket set and Draper spanner set.
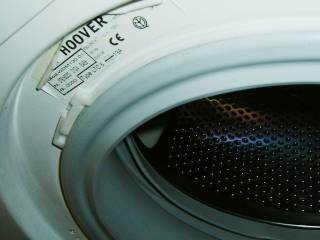
Getting inside the Hoover washing machine
Remember to disconnect the electricity from the washer dryer before opening it up.
I expected the whole front panel to come off, but the front is welded on. The sides and back are one piece, so the only ways in are from the top and through the door hole. For other jobs there is a removable hatch at the back and you might get to some things through the bottom, but most access will be through the top.
Remove the three screws along the top at the back of the machine to remove the plastic trim. The top (wood/melamine) slides out the back.
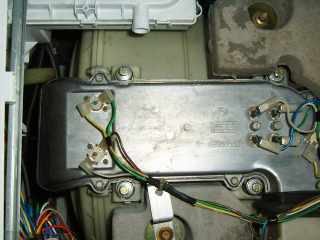
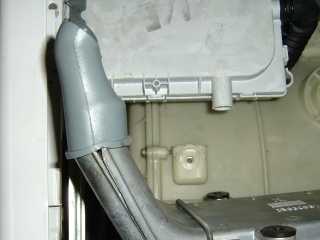
You’ll see a metal duct that goes in to a sleeve at the top of the rubber door seal. I found it easiest to remove this to get better access to the drum for removing the old and fitting the new door seal. It is held on by four screws (10 mm socket). You might need to remove the block of concrete (top right in picture) to be able to lift up the duct (need 10 mm and 13mm socket).
Removing the old door seal
The door seal is held to the front of the machine by a white plastic ring. Remove it by gently prising it away from the rubber and pushing the rubber in through the hole. Be careful not to break it as you will need it to fit the new seal.
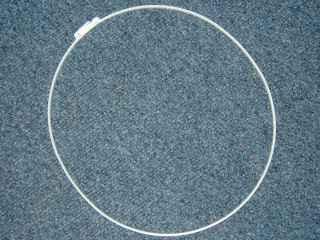
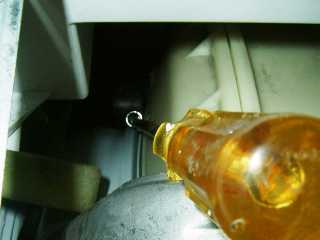
With the outside removed, you can get access to where the rubber attaches to the drum. The rubber seal is held to the drum by a wire ring that is tightened with a nut and bolt.

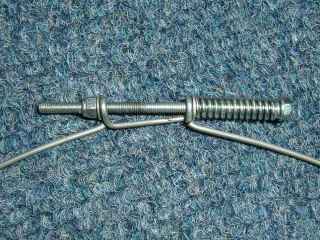
You need to loosen the wire ring by undoing the bolt. There’s not much room around it, so it’s quite difficult to get it turning.
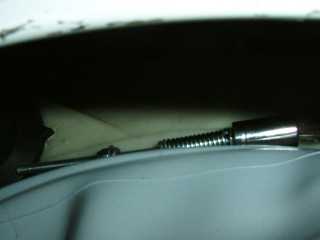
I pulled back the rubber and put the 7 mm socket on the bolt. I then held the nut in place with a 7 mm spanner. There wasn’t enough room to use the socket driver, so I needed to turn the socket by reaching through the open top of the machine. A long T-shaped socket driver would be useful, but I used a long screwdriver to turn the socket.
Once you’ve loosened the bolt enough, the wire ring will come over the rubber and you will be able to remove the rubber door seal from the drum.
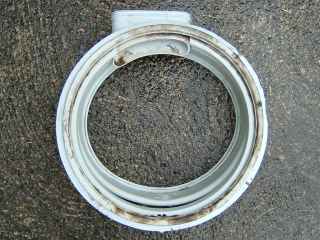
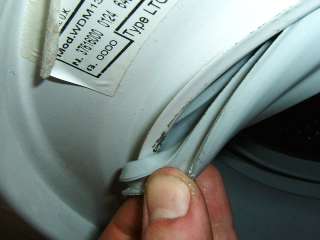
This is the old seal I removed, with lots of lovely mould stains:
Fitting the new door seal to the drum
The new door seal just needs to go on in place of the old one. The tricky bit is getting all the folds of rubber in to the right places. I’ll attempt to illustrate with some photos.
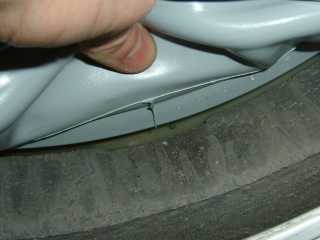
The bigger side of the seal goes around the drum. The seal folds under the edge of the drum and has a groove where the wire ring fits to hold it in place. This is it fitting around the outside edge of the drum:
This is the other side, where it meets the basket (the rotating metal basket where the clothes go):

It took me a few goes to get it right. I found it easiest to use one hand inside the seal pushing it in place, and the other hand on the outside of the seal pulling the folds open to get it to wrap around the edge of the drum. You’ll want to get this right or the machine might leak water out the bottom.
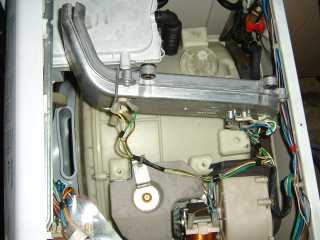
Make sure the rubber sleeve is in the right place at the top so that the metal duct can plug in to it. you can see it on the left of this photo. The duct is sitting on its side where I disconnected it to make room.
Put the wire ring in to the groove so that it will hold the rubber seal securely to the drum. Tighten the bolt the same way you got it off (e.g. with spanner and socket).
Fitting the duct in to the top of the door seal
The new door seal comes with an inner sleeve that attaches to the duct and then goes in to the sleeve at the top of the door seal. Both are held on to the duct with a springy strap that fits in to a groove on the door seal sleeve.
With the inner sleeve on the duct, push it in to the sleeve part at the top of the door seal. Make sure it’s fitted in well and put the springy strap around the outer sleeve. You can fit the duct back in place and screw it down.
Fitting the door seal to the front of the washing machine
The other side of the seal needs to be fitted to the door hole in the front of the machine. I found this a bit easier, but there are still various folds that fit either side.
Once it’s on, there should be a groove around the outside in to which the white plastic ring can be fitted. The ring is joined by a toothed connector that lets you tighten it in place.
You’ve done it
With the white plastic ring holding the door seal firmly in place, you can put the top back on the washing machine and do a little victory dance.
I hope this is helpful to anyone embarking on the same job. If nothing else, at least you know what you are getting in to and whether to tackle it yourself or pay a washing machine engineer.
Just replaced the gasket on my Candy washing machine (sister appliance). Done it on other models before so had an idea. However, the clear instructions and certainly images made this job so much easier on this my ‘new’ machine – not least as it has the plastic outer ring that I was not familiar with. Many thanks!
Comment by Gavin Gordon — 20 February 2008 @ 10:43 pm
Thank you so much for this information. I have just replaced my Bosch Exxcell 1200 door seal using your step by step. I am so delighted to have been guided through the process so expertly. The little bits of extra info are so helpful. The sense of acheivment is immense as it was daunting at times.I now realise the reason the old one got a little cut in it was because there were so many twists and folds in it. The one I’ve just put in is sitting so neatly, I’m sure the results from the wash will be better. Thanks again….Mai
Comment by Mai Mc Cann — 22 February 2008 @ 11:22 pm
Many, many thanks for your detailed guide to fitting the door seal. I have just replaced a rather mouldy one (and thanks to you I know how to avoid this now!) on my Hoover Nextra HNWL 3136. We were one step away from getting someone in to do this, but after coming across your website I bought one and fitted it for a fraction of the cost. Looks like new now. I’m not sure I’ve done the victory dance correctly, but I think I’ve mastered the door seal. Cheers!
Comment by Chris Mills — 27 March 2008 @ 11:26 pm
You are such a blessing! Thanks so much!!! I used energy saving balls that I had got at Aldi’s and after a wash discovered that they had got stuck against the door and seal of my washing machine and ripped holes in it. I bought a new seal thinking that it would be a quick task for my husband to replace it only to discover that it was going to be a bigger task than first imagined. I was thinking Oh no the fees are going to be exorbitant when he found your blog – so last night we followed your wonderful instructions and just want to say thank you so much for sharing your knowledge – our hoover is one model newer than your example but it all worked out perfectly so thank you thank you thank you!
Comment by Steven du Plessis — 17 April 2008 @ 7:55 pm
You are a star! Thank you for your instructions which you kindly shared. The steel ring seal on the inside was a nightmare. Could not get a spanner on the end to stop the nut turning. Ended up putting a hollow 7mm socket down the screw and holding it against the nut. Worked well that way.
Thanks again, must go and see if the garage is full of water! :-) Only jokinh – hopefully!!!
Comment by Gary Ferguson — 20 June 2008 @ 4:27 pm
I just did this job on our Bosch machine this evening and it was a nightmare – I had to do it all through the access hole – no removable front panels. I bought a 7mm socket but it was nearly impossible to get any force onto the head of the bolt so it may be a bit loose! I put new brushes in the drive motor a few years ago but this was much more difficult. My advice would be to get someone else to do it (unless your front panel is removable).
Comment by Kevin Morris — 17 July 2008 @ 9:30 pm
Took a while but worth the effort. Many thanks for the instructions – saved £100!
Comment by Richard R — 27 August 2008 @ 9:50 pm
Warning:
When removing the heating unit on the top of the drum so you can access the seal – dont pull too hard – you risk breaking the electronic control unit. Remove that first. (Yes – i broke it!!!!)
Comment by Jim Cullen — 1 October 2008 @ 10:32 am
Hi, Could you tell me would this work on a Hoover Nextra 1500 please. Thanks
Comment by sandy — 1 October 2008 @ 1:42 pm
front panel removable ones are easy to change the seal but not the ones nonremovable.. i ve gt 3 workin washin machines but not wiv the door seal on. nice explanation here mate but this is easy tell us the nonremovable panel ones….
Comment by evo — 12 November 2008 @ 5:37 pm
Hi, thanks for this – helped a lot – just replaced seal on a Zanussi, no removeable front panel. The interior metal ring was actually just a big spring – very fiddly to get back on – needed an extra pair of hands to hold it in place as I worked it around.
Only thing I’m not happy with is the method of tightening the front plastic ring (with the alligator teeth) – is there a special way of doing this ?
Comment by Alan — 19 December 2008 @ 5:32 pm
Hi, thanks so much on the advice on fitting the replacement rubber door seal.
Answer to alans question left on the 19th dec 2008.
When you are fitting the front plastic ring with alligator teeth i used a set of pump pliers also known as 5 holes pliers, to tighten it.
Comment by michael — 3 January 2009 @ 1:42 pm
Very helpful, I had to do exactly the same thing…thanks for taking the time to publish this! I have a Hoover Nextra HNWF 3137 which was almost the same.
Comment by Hal Sclater — 25 January 2009 @ 3:58 pm
Hi, I wonder if anyone can help?
I’m replacing a broken door hinge on my WDM130 and have come across the weird 5-point star screws securing the old one. Does anyone know what kind of screwdriver I need (and where I can get one) as phillips screwdrivers don’t work? Many thanks, Ian
Comment by Ian White — 28 January 2009 @ 1:24 pm
Hi Ian.
The star shaped screws are known as “Torx” and are used on some appliances and cars. You can buy them as individual screwdrivers or in sets similar to hex/allen keys. The specific size you want for the door on the WDM130 is T27, so make sure that size is included in any set you buy.
Here are a few examples:
Silverline 9 Piece Trx Key Set
Torx key set
Silverline T27 Trx Screwdriver
Comment by Scott — 28 January 2009 @ 2:25 pm
Brilliant Scott, thank you very much. Off to buy one!
Comment by Ian White — 28 January 2009 @ 2:40 pm
Scott, thank you so much for the instructions and tips.
I have just completed the job on a 22 year old Indesit 2255E! I needed it to limp on for a few more months until I have a new kitchen fitted so I didn’t mind spending £12 on the part to do it myself.
There’s no removable front panel, but I took the top off which gave me a bit more access space, but being ambidexterous and a contortionist would have helped more!
I feel very pleased with myself, but have decided that a gin and tonic is more appropriate than the victory dance! Cheers!
Comment by Jeannie White — 6 February 2009 @ 7:24 pm
i have just oredered a new door hande for my hoover HNF 2127 washing machine but am uncetain how to replace it please help me.
Comment by steven davis — 6 March 2009 @ 11:52 am
Hooray!! What a day. And I’ve just finished. What a fab set of instructions. Without these I would have been even more clueless! Now the final test of my handywork – lets get started on mount washing. Huge thanks for your efforts with these instructions…
Comment by jessica — 1 May 2009 @ 2:35 pm
Hello. I would like to replace the rubber seal on my Zanussi washing machine. I have noticed that there is a platic ring with a clip that holds the old seal in place. Do I open the clip inorder to be able to remove the old seal? If so, how do I do this without breaking the ring? Any help/tips will be much appreciated. Many thanks. Aziza.
Comment by Aziza Mahomed — 20 May 2009 @ 9:39 am
Hi Aziza.
Initially, I tried to remove the ring by opening the clip, but was concerned about breaking it. Instead, I prised the plastic ring out a bit with a small screwdriver and was able to squeeze the rubber through. Once it was off, I could open it ready to put back on to the new rubber.
It’s hard to say, but perhaps you can do the same thing with yours. Good luck!
Comment by Scott — 20 May 2009 @ 10:09 am
Thanks for the instructions, they did the trick for an old Hoover Ecologic.
I struggled for a couple of hours before coming across these fitting details and I had the seal replaced in 20 minutes!
Comment by Glen — 30 May 2009 @ 1:54 pm
The victory dance after saving the call out charge was a big highlight of the job. Also having another person (the wife) to take over at the point where you are losing it with the rubber folds really helps.
Great advice and despite a few words my mother wouldn’t like, quite straight forward to follow. Pictures particulary useful. Thanks.
Comment by Danny — 14 June 2009 @ 12:51 pm
Thanks so much for the instructions. The photos helped loads. Just tested it out and so far so good :D
Comment by Helen — 18 June 2009 @ 3:36 pm
Hurrah! The model of my machine wasn’t quite the same, but this was still the most helpful site on the net. Thank you, thank you, thank you!
Comment by Nathan — 25 September 2009 @ 11:58 am
Thanks for sharing your experience and advice- much appreciated. I have a Bosch Maxx and while it had different fixings,was the same principle.
On the Bosch there is a very strong spring which clips together to make a ring, that sits in a groove and holds the seal to the drum. I found the best thing was to do was clip the spring together first, before trying to roll it into the groove. However, it is so short and needs to be stretched so much, that it takes two people to then push this spring into the groove, or it continually pops out.
Comment by Jeremy — 11 October 2009 @ 8:35 am
hi
WARNING TO OTHERS!
Just pay the experts to do this job!
I have a Zanussi washing machine when I attempted to repair the seal the inner drum is razor sharp, cut my hand badley, had to have the day off work. oops!.
Next time I will be paying the experts!
brian
Comment by brian — 20 October 2009 @ 10:37 pm
Thank you, thank you, after 2 days of trying to fit seal and find site to help, i came across yours, the job took 5 mins, after i skimmed your advice. again thank you.
Comment by Yvonne — 29 November 2009 @ 9:09 pm
Thank you sooo much. Have done this job before on Indiset but Candy is definitely harder (less space to work in). Not finished yet – break for cuppa – fingers crossed!
Comment by Maureen Ward — 18 December 2009 @ 2:50 pm
Really useful and stopped us me and my partner arguinga about whether to do it this way or that way – if we disagreed we just consulted your ‘instructions’!Thank you for sharing
Comment by Lynxie — 3 May 2010 @ 2:33 pm
Thank you very much for the excellent photos and the captions. Today I was replacing the door seal on our Candy CMD 106 and I got stuck half way through trying to get the new door seal to go on the right way. Some youtube videos got me started but your top-notch photos saved the day because your machine matches my model almost exactly! If you have any other photo galleries about washing machine repair please post them! Thank you very much once again,
Joe,
Croatia
Comment by Joe Kap — 21 May 2010 @ 6:35 pm
Thank you – could not have done this without your help (and that of my very patient wife!). Victory is so sweet but a LARGE gin and tonic makes it all worth while
Comment by Andy — 23 September 2010 @ 11:03 pm
[…] scottbarnhamc […]
Pingback by How to repair washing machine door seal — 22 February 2011 @ 3:53 pm
Much appreciated, this is almost identical and works for the Hoover HW160MUK too!
Thanks to you and to Tim Berners-Lee for creating the internet and saving me from some dodgy geezer!
Comment by Asinine — 7 March 2011 @ 3:24 pm
As an engineer myself one appreciates good technical back up, in this case Hoover Quattro 1100 AB handbook nil, your instructions – 100%. If you are not already a technical author you should be.
If only everyones technical descriptions was as good as yours my job would be a lot simpler. Thank you for making an old man happy.
Comment by Mac — 10 March 2011 @ 10:41 pm
Whew! Just replaced the door seal on a Candy CSBL 100 (fixed front panel)… I couldn’t have done it without your clear instructions and helpful photographs. Thank-you thank-you thank-you! :)
Getting the new seal on was the toughest part (I mean who welds the front panel on??)… I added a little bit of washing up liquid into the groove that attaches the seal to the drum… which seemed to do the trick.
Thanks so much again – the victory dance was followed rather rapidly by me collapsing onto the sofa :)
Comment by Ant — 12 March 2011 @ 7:06 pm
Hoover washer/dryer HNWL3136S
I read the UK Whitegoods guide to changing the door seal, which said Hoover washer/dryers were a nightmare so almost called in an engineer. Luckily I found your blog, followed the instructions/photos and it was fairly easy. The most difficult thing was holding the nut to unscrew the drum clamp,not much space to work – they should have made it a captive nut!
Many thanks for your help, much appreciated
Comment by Steve — 28 March 2011 @ 1:15 pm
Thank you – I’ve just replaced the rubber seal on my Hoover Six Express 1200 – which is a little different to the model you show in your step-by-step pics, but the essentials are the same. It was very straightforward and simple – and obviously a lot cheaper than getting a repair man out or buying a new machine. Thanks again – I’m thrilled!
Comment by Ed — 13 May 2011 @ 1:08 pm
Ecellent article. Replaced the seal on my Hoover HNF7138 today using exactly this method. Thanks
Comment by Shaun — 18 May 2011 @ 8:30 pm
thanks for a brillant blog. just changed the door seal on a hoover nextra washer drier.tried hoover techinal help but they were only interested in sending out an engineer.
Comment by michael — 17 June 2011 @ 6:48 pm
Many thanks I could not have done it without your help. Saved me money on getting an engineer out. Onece again thank you for taking the time to post this article.
Comment by Jon — 18 June 2011 @ 11:21 pm
I have removed the three screws at the back of my Hoover AB 130 – 001 and also the plastic trim but I can’t slide the wood/melamine top out the back. Can someone provide some assistance please?
Comment by Wayne — 4 July 2011 @ 8:57 pm
Hello,
Thank you so much for your time taken to write a clear dialog of what to do and think of when replacing a door seal. I had given up until my girlfriend found your blog.
5th time lucky the seal stayed in place, thanks to you
hnl662 Hoover washing machine
Paul (Bath)
Comment by Paul — 21 August 2011 @ 12:40 am
Hi Scott
This set of instructions enabled me to change the seal on my Hoover HW5213MUK washer dryer, also with a welded on front. The advice about the screwdriver working the socket in the restricted space when removing the metal clipband was spot on… and that was definitely the worst bit of the job. But all done, drip free and not expensive… thanks a lot.
Comment by Mark — 24 September 2011 @ 4:37 pm
Many Thanks for this Info. I have wrestled with the seal on my Hoover HNWL6136 for 2 hours trying to get the seal on the wrong way after changing the bearings. After finding your blog I got the seal on in ten minutes.
I can’t thank you enough you have saved the day.
Comment by G M Reynolds — 14 October 2011 @ 12:59 am
I got the old seal off my hoover washing machine but could not get the new one on.
I almost gave up and called an engineer.Then I followed your instructions and it only took me about 10 minutes after that.Thank you soooooo very much your are a star.
Comment by Loraine — 12 November 2011 @ 9:31 pm
Thank you for your detailed info, really helped to do the job in good time
BTW I found a head torch useful too :-)
Comment by Mark — 11 February 2012 @ 6:51 pm
This is (probably) one of the worst FIY jobs you could volunteer for. I have a Hoover HNL model and the front panel does not come off. It makes removing the retainer wire and old door seal a real ‘mare and then there’s fitting the new seal. 1 hour to fit and another 30 minutes to fit the wire again. The intructions here are great but assume you can take the front panel off.
I now know why the engineers charge so much.
Comment by Michael — 12 February 2012 @ 8:22 pm
I assumed i would be able to remove the front panel on my Hoover HSWD 126, however its not possible and makes this job much hader! These instructions were great though, couldnt have done it without them. Removing the duct from the top made things much easier.
Thanks so much for the instructions.
Comment by Ian — 17 March 2012 @ 3:41 pm
A great help, thank you. A very detailed explanation with helpful photographs. I wouldn’t have done the job without it as it was not the easiest of tasks and still took a little while. Very happy at saving engineer costs. Taking the top off made it much easier as I originally started working through the front! Excellent instructions.
Comment by Bob — 27 April 2012 @ 2:11 pm
Scott,
many thanks.
Replaced successfully!
At first I thought it was going to be impossible but your guide gave me enough info to do it.
Cheers
Mark
Comment by Mark — 20 July 2012 @ 3:43 pm
I bought a replacement seal for our Hoover WDM 120 from e-Spares, having had a good experience with them over fitting a new seal for our Bosch dish-washer. The e-Spares video for that was very clear nad made the job straightforward. Although there were minor differences (clip types and a couple of screw positions), no problems.
However, the video they present for changing a front seal for a ‘generic’ washing machine is for a Bosch, although they state it is also for other similar makes. Certainly no video for a Hoover. Very clear but completely inappropriate.
I cannot recommend buying anything from e-Spares unless you know how to do the change or their instructions are REALLY for your appliance. Do not believe the ‘other types are similar’ line. They are not.
Scott, your description for changing the Hoover seal is very clear and I thank you for it, but I am now very nervous about continuing. The seal doesn’t actually leak. My wife wants it changed ‘because it smells’. I think she endures the alleged smell for a while longer.
I will have a beer and give it a coat of looking-at.
How about an instruction-set for changing the door-seals on a 40 year-old Land Rover……..?
Comment by bob sunderland — 23 August 2012 @ 4:15 pm