Replacing door seal on Hoover WDM-130 Washing Machine

19 August 2007

I recently replaced the rubber door gasket on a Hoover washer dryer. It’s the first time I’ve done any repairs on a washing machine and I didn’t find much information online. I haven’t read the Haynes Washing Machine Manual but it might have more information.

I worked on a Hoover WDM-130, but the procedure will likely be the same for other Hoover and Candy washing machines and possibly other makes.

Mouldy door seal and brown marks on clothes

The door seal, also know as door gasket, is the rubber that goes between the drum and the door and allows the drum to bounce around without any water escaping. It has lots of folds and these can get mouldy, start to smell and possibly leave stains on clothes.

There’s some good advice from UK Whitegoods on how to prevent it happening, such as leaving the door open to allow the seal to dry and doing a monthly “service wash” (run it through empty at a high temperature).

Once the door seal has mould, it’s difficult to get rid of. My washing machine was leaving brown marks on clothes after they had been through a wash, so I had to do something about it.

Replacing the door seal is not super difficult, but it’s quite awkward to get to. If you’re fairly handy and have suitable tools, you should be ok.

Replacement rubber gasket

I bought a replacement door seal from UK Whitegoods (part number 91620118 – Candy Hoover Door Seal). It was a good price and delivered quickly. The part looks green in their picture, but it is grey as you’d expect!

Tools you will need

  • 7 mm socket
  • 7 mm spanner
  • 10 mm socket
  • 13 mm socket (maybe)
  • long T-bar handle for 7 mm socket (about 30 cm long) – or other way of turning it (I used a screwdriver)

If you don’t already have the tools, you might consider the Draper socket set and Draper spanner set.

Getting inside the Hoover washing machine

Remember to disconnect the electricity from the washer dryer before opening it up.

I expected the whole front panel to come off, but the front is welded on. The sides and back are one piece, so the only ways in are from the top and through the door hole. For other jobs there is a removable hatch at the back and you might get to some things through the bottom, but most access will be through the top.

Remove the three screws along the top at the back of the machine to remove the plastic trim. The top (wood/melamine) slides out the back.

Inside top view

You’ll see a metal duct that goes in to a sleeve at the top of the rubber door seal. I found it easiest to remove this to get better access to the drum for removing the old and fitting the new door seal. It is held on by four screws (10 mm socket). You might need to remove the block of concrete (top right in picture) to be able to lift up the duct (need 10 mm and 13mm socket).

Removing the old door seal

The door seal is held to the front of the machine by a white plastic ring. Remove it by gently prising it away from the rubber and pushing the rubber in through the hole. Be careful not to break it as you will need it to fit the new seal.
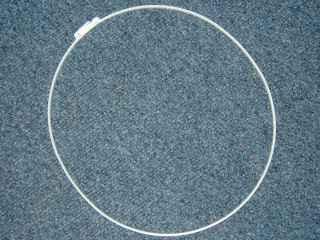
White plastic ring

With the outside removed, you can get access to where the rubber attaches to the drum. The rubber seal is held to the drum by a wire ring that is tightened with a nut and bolt.

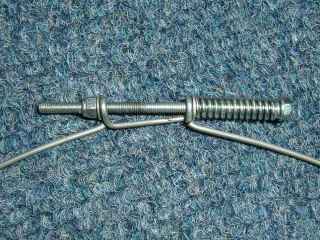
Wire ring

Tightening bolt for wire ring

You need to loosen the wire ring by undoing the bolt. There’s not much room around it, so it’s quite difficult to get it turning.
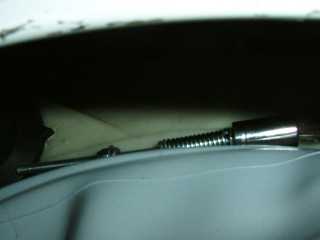
Accessing the bolt

I pulled back the rubber and put the 7 mm socket on the bolt. I then held the nut in place with a 7 mm spanner. There wasn’t enough room to use the socket driver, so I needed to turn the socket by reaching through the open top of the machine. A long T-shaped socket driver would be useful, but I used a long screwdriver to turn the socket.
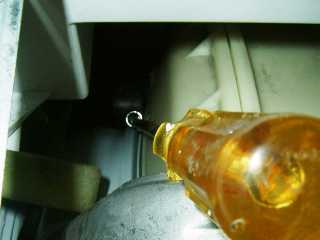
Bolt adjustment top view

Once you’ve loosened the bolt enough, the wire ring will come over the rubber and you will be able to remove the rubber door seal from the drum.

This is the old seal I removed, with lots of lovely mould stains:
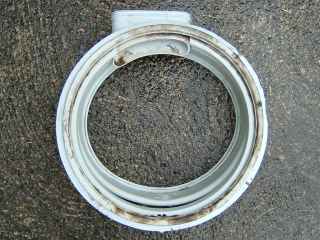
Old seal with mould

Fitting the new door seal to the drum

The new door seal just needs to go on in place of the old one. The tricky bit is getting all the folds of rubber in to the right places. I’ll attempt to illustrate with some photos.

The bigger side of the seal goes around the drum. The seal folds under the edge of the drum and has a groove where the wire ring fits to hold it in place. This is it fitting around the outside edge of the drum:
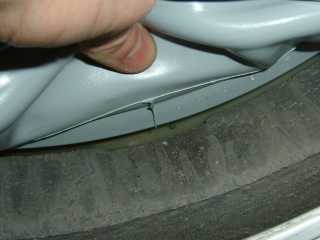
Seal around edge of drum

This is the other side, where it meets the basket (the rotating metal basket where the clothes go):
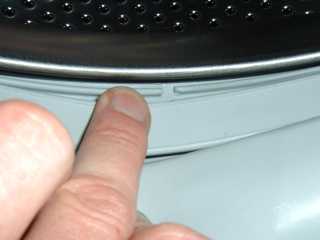
Seal meets metal drum

It took me a few goes to get it right. I found it easiest to use one hand inside the seal pushing it in place, and the other hand on the outside of the seal pulling the folds open to get it to wrap around the edge of the drum. You’ll want to get this right or the machine might leak water out the bottom.

Make sure the rubber sleeve is in the right place at the top so that the metal duct can plug in to it. you can see it on the left of this photo. The duct is sitting on its side where I disconnected it to make room.
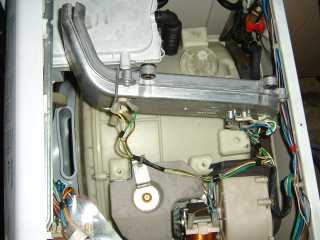
Sleeve at top of seal

Put the wire ring in to the groove so that it will hold the rubber seal securely to the drum. Tighten the bolt the same way you got it off (e.g. with spanner and socket).

Fitting the duct in to the top of the door seal

The new door seal comes with an inner sleeve that attaches to the duct and then goes in to the sleeve at the top of the door seal. Both are held on to the duct with a springy strap that fits in to a groove on the door seal sleeve.
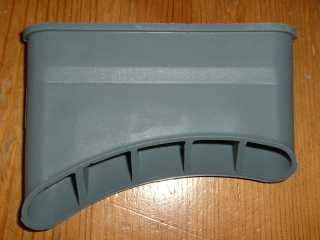
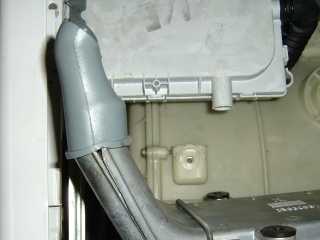
Inner sleeve that fits on duct

Inner sleeve fitted to duct

With the inner sleeve on the duct, push it in to the sleeve part at the top of the door seal. Make sure it’s fitted in well and put the springy strap around the outer sleeve. You can fit the duct back in place and screw it down.

Fitting the door seal to the front of the washing machine

The other side of the seal needs to be fitted to the door hole in the front of the machine. I found this a bit easier, but there are still various folds that fit either side.
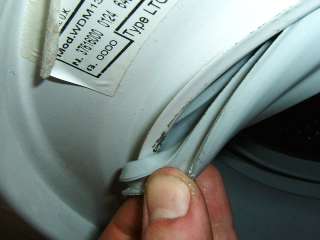
Seal around edge of door hole at front of machine

Once it’s on, there should be a groove around the outside in to which the white plastic ring can be fitted. The ring is joined by a toothed connector that lets you tighten it in place.
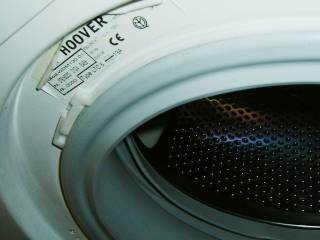
White plastic ring tightener

You’ve done it

With the white plastic ring holding the door seal firmly in place, you can put the top back on the washing machine and do a little victory dance.

I hope this is helpful to anyone embarking on the same job. If nothing else, at least you know what you are getting in to and whether to tackle it yourself or pay a washing machine engineer.

Filed under: Washing Machine — Scott @ 6:31 pm

Uploading images to a dynamic path with Django

31 July 2007
Update: There’s a new method you should try first. See: Dynamic upload paths in Django

Django makes it easy to upload images by adding an ImageField to your model. The images are uploaded to your media path in a subdirectory specified with the upload_to parameter which can contain a date/time pattern like %Y/%m/%d.

class Photo(models.Model):
    caption = models.CharField(blank=True, maxlength=100)
    image = models.ImageField(upload_to='photos/%Y/%m/%d')

In this example, images will be uploaded to a path like:

/path/to/media/photos/2007/07/31/flowers.jpg.

Sometimes you want to keep related images together, rather than spreading them over multiple date directories. But if you have a lot of images, you won’t want them all stored in a single directory.

It would be nice if there was a way to upload to a directory specific to the model, perhaps a path incorporating the model object’s id or a unique slug. Something like:

/path/to/media/photos/1234/flowers.jpg
or
/path/to/media/photos/scotland-trip/castle.jpg
/path/to/media/photos/scotland-trip/bonnie-purple-heather.jpg

Django doesn’t have a standard way to do this at the moment (it’s pending a design decision according to ticket #4113).

I needed to do this in a project recently and tried various different approaches. Here’s what I tried – skip to the working solution if you’re not interested in the failed attempts.

Attempt 1: Specify upload_to dynamically

Why not make upload_to include the id of the model?

class Photo(models.Model):
    caption = models.CharField(blank=True, maxlength=100)
    image = models.ImageField(upload_to='photos/%d' % self.id)

Because there is no self; that’s why. Django builds the model with the fields we specify, but at that point, there is no instance of the model, so self is meaningless. Whatever we put in upload_to here will apply to all instances of the model.

Attempt 2: Set upload_to on save

How about overriding the save method of the model and setting upload_to on the image field at that point. Something like:

class Photo(models.Model):
    caption = models.CharField(blank=True, maxlength=100)
    image = models.ImageField(upload_to='photos')

    def save(self):
        for field in self._meta.fields:
            if field.name == 'image':
                field.upload_to = 'photos/%d' % self.id
        super(Photo, self).save()

It’s a bit icky having to iterate through self._meta.fields to find the right one. But a bigger problem is the image file may well be written to the path before save is called.

Usually you would call photo.save_image_file(filename, content) to save the file content then photo.save() to save the model’s fields, including the path in the image field. By the time we set upload_to, it’s too late.

Attempt 3: Override ImageField and pass a callable for upload_to

Taking a different approach, how about making a new class that derives from ImageField and takes either a new parameter or a callable for the upload_to parameter. Something like:

class SpecialImageField(ImageField):

    def get_directory_name(self):
        if callable(self.upload_to):
            return self.upload_to()
        else:
            return super(SpecialImageField, self).get_directory_name()

We override the get_directory_name method which is actually defined in FileField (from which ImageField inherits).

The problem is, we’re still having to pass something (a callable) for the upload_to parameter. Again, at the time the ImageField is created, we are not in an instance of the model, so we can’t pass a it a model method. We could pass a module-level function, but that’s not enough information; we want to set the path using something in the model instance.

Attempt 4 – the one that worked: Override ImageField get model instance and ask it

After going round in circles and learning a few things on the way, I came across this page in the Django wiki (mental note: check wiki first in future).

It shows how a custom field can get hold of the model instance using dispatcher. I wrote CustomImageField to get the model instance when the model instance is initialised and ask it to supply a new upload_to path.

The field looks like this:

from django.db.models import ImageField, signals
from django.dispatch import dispatcher

class CustomImageField(ImageField):
    """Allows model instance to specify upload_to dynamically.
    
    Model class should have a method like:

        def get_upload_to(self, attname):
            return 'path/to/%d' % self.id
    
    Based on: http://code.djangoproject.com/wiki/CustomUploadAndFilters    
    """
    def contribute_to_class(self, cls, name):
        """Hook up events so we can access the instance."""
        super(CustomImageField, self).contribute_to_class(cls, name)
        dispatcher.connect(self._post_init, signals.post_init, sender=cls)
    
    def _post_init(self, instance=None):
        """Get dynamic upload_to value from the model instance."""
        if hasattr(instance, 'get_upload_to'):
            self.upload_to = instance.get_upload_to(self.attname)

    def db_type(self):
        """Required by Django for ORM."""
        return 'varchar(100)'

Note the db_type method which replaces the get_internal_type method in Django trunk. It is used when you run manage.py syncdb to know what field type to create in the database.

The field is used in a model like this:

class Photo(models.Model):
    caption = models.CharField(blank=True, maxlength=100)
    image = CustomImageField(upload_to='photos')

    def get_upload_to(self, field_attname):
        """Get upload_to path specific to this photo."""
        return 'photos/%d' % self.id

get_upload_to is passed the attname of the field in that model (in this case “image”). This is so the model can distinguish between multiple custom image fields.

Ok, so the bit I’ve glossed over is that the model may not have an id at the time get_upload_to is called. If the model is new and hasn’t been saved you’ll need to save it or work something else out before you can return the dynamic upload_to path. But that was always the case, so I’m not taking the blame.

In my case, the Photo model was related to some other model (e.g. Room) which I called to get the path. It didn’t matter that Photo didn’t have an id because it was related to something that did.

So now I get to save images to paths like:

/path/to/media/photos/12345/front.jpg
/path/to/media/photos/12345/rooms/kitchen.jpg
etc

Update – 20 May 2008:

Here’s a small update to the CustomImageField class. The version above listens for the post_init signal and use it to get the dynamic upload path. This works fine when you use it like:

photo = Photo.objects.create(...)

Calling create saves the object and loads it so that post_init gets called. However, if you create the model object and upload a file before saving, it will not know about the dynamic upload path.

The version below listens for the pre_save signal instead and gets the dynamic upload path at that point. You can use it like:

photo = Photo()
photo.save_image_file(filename, content)

Note that you may still need to save the model before uploading if your dynamic path includes the model id (which is not set until it is saved).

Here is the new version of the field:

class CustomImageField(ImageField):
    """Allows model instance to specify upload_to dynamically.
    
    Model class should have a method like:

        def get_upload_to(self, attname):
            return 'path/to/%d' % self.id
    
    Based on: http://code.djangoproject.com/wiki/CustomUploadAndFilters    
    """
    def __init__(self, *args, **kwargs):
        if not 'upload_to' in kwargs:
            kwargs['upload_to'] = 'dummy'
        self.prime_upload = kwargs.get('prime_upload', False)
        if 'prime_upload' in kwargs:
            del(kwargs['prime_upload'])
        super(CustomImageField, self).__init__(*args, **kwargs)
    
    def contribute_to_class(self, cls, name):
        """Hook up events so we can access the instance."""
        super(CustomImageField, self).contribute_to_class(cls, name)
        if self.prime_upload:
            dispatcher.connect(self._get_upload_to, signals.post_init, sender=cls)
        dispatcher.connect(self._get_upload_to, signals.pre_save, sender=cls)
        
    def _get_upload_to(self, instance=None):
        """Get dynamic upload_to value from the model instance."""
        if hasattr(instance, 'get_upload_to'):
            self.upload_to = instance.get_upload_to(self.attname)

    def db_type(self):
        """Required by Django for ORM."""
        return 'varchar(100)'

In some cases you will still want the path to be specified when the model is initialised rather than saved. If you are editing a model and want to be able to save a new image without saving the model first, it needs to get the dynamic upload path when the post_init signal is raised.

This new CustomImageField takes an optional prime_upload argument. If true, it will also listen for the post_init event and get the dynamic upload path. You can use it like:

class Photo(models.Model):
    image = CustomImageField(prime_upload=True)
photo = Photo.objects.get(pk=photo_id)
photo.save_image_file(filename, content)

This is all a bit fiddly still, but it does the job until Django has a native way to specify the upload path per-instance.

Filed under: Django — Scott @ 9:25 pm

Using Django with cron for batch jobs

26 April 2007

The MVC-style separation in Django makes it easy to write Python scripts to handle automated jobs. They can query the database using the Django database API and create and manipulate objects. Essentially everything you can do in a view, except you don’t have a request object since you aren’t in the context of an http request.

For my current project I have a couple of scripts that are executed by cron. One script emails users telling them what’s new. It gets this information by calling methods on various models. Another script uses the database API to gather some statistics on the state of the system (e.g. how many registered users and who were the last five) and sends them by email.

Here’s some code.

#! /usr/bin/env python

import sys
import os

def setup_environment():
    pathname = os.path.dirname(sys.argv[0])
    sys.path.append(os.path.abspath(pathname))
    sys.path.append(os.path.normpath(os.path.join(os.path.abspath(pathname), '../')))
    os.environ['DJANGO_SETTINGS_MODULE'] = 'settings'

# Must set up environment before imports.
setup_environment()

from django.core.mail import send_mail
from django.contrib.auth.models import User

def main(argv=None):
    if argv is None:
        argv = sys.argv

    # Do stuff here.  For example, send an email reporting number of users.
    
    user_count = User.objects.count()
    message = 'There are now %d registered users.' % user_count

    send_mail('System report',
              message,
              'report@example.com',
              ['user@example.com'])


if __name__ == '__main__':
    main()

The interesting bit is in setup_environment which adds paths to the Python path so when you import modules used in your project (e.g. import myapp.models) Python knows where to find them.

In my case, I put my scripts in to the Django project directory (i.e. next to settings.py). The path to the Django project needs to be in the Python path so that imports work. setup_environment uses sys.path.append to add the path of the script that is executing (e.g. /srv/www/mydjangoproject/status_report.py) and its parent directory. This is sufficient to make imports in the project work.

The other thing that needs to be set is the DJANGO_SETTINGS_MODULE environment variable. It’s just the name of the settings module, by default “settings”.

There may be a better way to do this setup, but it seems to work ok.

Now you can call the script directly or from cron. If you’re sending emails from your script, you can write straight text templates (rather than html) and use django.template.loader.render_to_string to render the template with some variables in to a string to send by email.

from django.template.loader import render_to_string

email_body = render_to_string('reports/email/score_report.txt',
                              {'user': user,
                               'top_score': top_score})

Update: Here’s a cleaner way from Jared. It uses the setup_environ function from django.core.management.

Update: James Bennett has an excellent write-up on standalone Django scripts.

Filed under: Django — Scott @ 5:45 pm

Filtering model objects with a custom manager

I have various models in my current Django project that can be marked as “deleted”. They’re still in the database, but filtered out and as far as most of the code is concerned, they no longer exist. A simple way to do this is with a custom manager that filters the query set.

# Custom manager filters out deleted items.
class NotDeletedManager(models.Manager):
    def get_query_set(self):
        return super(NotDeletedManager, self).get_query_set().filter(deleted=False)

class Article(models.Model):
    author = models.ForeignKey(Author, related_name='articles')
    ...
    deleted = models.BooleanField(default=False)
    # Use custom manager as default manager for this model.
    objects = NotDeletedManager()

I can then refer to Article.objects.all() and get only those articles not marked deleted. Likewise, author.articles.all() gets articles for a given author that are not marked deleted.

Next I wanted to be able to access deleted items. Time for another manager:

class DeletedManager(models.Manager):
    def get_query_set(self):
        return super(DeletedManager, self).get_query_set().filter(deleted=True)

class Article(models.Model):
    ...
    objects = NotDeletedManager()
    deleted_articles = DeletedManager()

It seems a bit redundant, but two managers is not bad. Especially since they can be used with any model that has a “deleted” field.

Next I wanted to filter related objects based on whether they belong to a deleted object. For example, if an author is deleted, all articles by that author should not show up in articles.

class NotDeletedArticleOrAuthorManager(models.Manager):
    def get_query_set(self):
        return super(NotDeletedArticleOrAuthorManager, self).get_query_set().filter(deleted=False, author__deleted=False)

class Article(models.Model):
    ...
    objects = NotDeletedArticleOrAuthorManager()

This is getting a bit messy. I’d rather pass parameters to the manager telling it what to filter out. Something like…

class FilterManager(models.Manager):
    "Custom manager filters standard query set with given args."
    def __init__(*args, **kwargs):
        self.args = args
        self.kwargs = kwargs

    def get_query_set(self):
        return super(FilterManager, self).get_query_set().filter(*self.args, **self.kwargs)

class Article(models.Model):
    ...
    objects = FilterManager(deleted=False, author__deleted=False)
    deleted_articles = FilterManager(deleted=True)

Unfortunately, this doesn’t work. The filters are applied when I call the manager directly like Article.objects.all(), but no filters are applied if I go through a relationship like author.articles.all() (returns deleted articles as well).

The problem is the related managers (see the source django/db/models/fields/related.py e.g. ForeignRelatedObjectsDescriptor.__get__). They create a class that dynamically inherits from the models default manager (our custom manager) then return a new instance of it. The new instance doesn’t have any parameters passed to its __init__ method, so there are no filters.

My workaround is to use a function to return a custom class that has the filter parameters saved in the class, so they don’t get passed to an instance. When a related manager inherits from this class, it still has our filters in place.

def get_filter_manager(*args, **kwargs):
    class FilterManager(models.Manager):
        "Custom manager filters standard query set with given args."
        def get_query_set(self):
            return super(FilterManager, self).get_query_set().filter(*args, **kwargs)
    return FilterManager()

class Article(models.Model):
    ...
    objects = get_filter_manager(deleted=False, author__deleted=False)
    deleted_articles = get_filter_manager(deleted=True)

The class is declared in the function and gets args and kwargs from the function. They are therefore “baked in” to the class and don’t need to be passed as parameters to __init__.

This is only minimally tested, but seems to work. Perhaps there is a better way, but for now this is what I have.

Filed under: Django — Scott @ 4:28 pm
« Previous Page